In SOA Suite you can use the Database Adapter to perform CRUD operations on data within a database. You can even work with multiple (related) tables within in a single database adapter. I recently had a customer that was having problems inserting data into multiple tables using the database adapter. The problem turned out to be related to a mis-configured database adapter but it gave me a chance to get a little deeper in using the Database Adapter and how to insert data using the Sequence feature of Oracle Database.
I’ve never really used Oracle Database (grew up with MySQL) so I wasn’t familiar with how to use Sequences (or an AUTO-INCREMENT column in MySQL speak) in an Oracle Database. I created this post just in case there are any others out there like me and so that I have somewhere to refer to when I need to do it again.
Step 1: Create the Database
Should be pretty obvious to any Oracle DBA’s reading this, but for me it was very different to the way I’m used to in MySQL. There’s not really a concept of a database like in MySQL (which is really just a collection of tables), instead you create a schema where those tables live within the same Oracle Database. The easiest way to do this is to create a user and add tables to the schema created for him.
CREATE USER DEMOUSER IDENTIFIED BY DEMOPASS;

GRANT "CONNECT" TO DEMOUSER ;
GRANT "RESOURCE" TO DEMOUSER ;
Then let’s create the tables. To keep it simple we’ll just create two bare-bones tables to demonstrate adding data to multiple tables at once. You will need to log in as the above user so that these tables are created in the correct schema. I used SQL Developer to create everything via the GUI, but you can also do the following as seperate queries or on the sqlplus command line.
Note: Make sure the ID fields are set to NUMBER(12). If not they will default to allowing decimal places (eg: 1.0) and the DbAdapter will not create incrementing ids into them correctly. It will end up inserting 0.0 each time. Took me awhile to work this out!
CREATE TABLE PROPERTY (
     ID                 NUMBER(12)    NOT NULL,
     ADDRESS_ID         NUMBER(12)    NOT NULL
);
ALTER TABLE PROPERTY ADD CONSTRAINT PROPERTY_PK PRIMARY KEY (ID) ENABLE;

CREATE TABLE ADDRESS (
     ID                 NUMBER(12)     NOT NULL,
     CODE               VARCHAR(10)    NOT NULL
);
ALTER TABLE ADDRESS ADD CONSTRAINT ADDRESS_PK PRIMARY KEY (ID) ENABLE;
ALTER TABLE PROPERTY ADD CONSTRAINT ADDRESS_ID_FK FOREIGN KEY (ADDRESS_ID) REFERENCES ADDRESS (ID) ENABLE;
Finally we need to create the sequences. Sequences contain the information about the incrementing index such as what number they are up to, how they should increment, caching options etc. You need to create a sequence for each primary key in the above tables.
CREATE SEQUENCE ADDRESS_ID_SEQ
     START WITH 1
     MAXVALUE 999999999999999999999999999
     MINVALUE 1
     NOCYCLE
     NOCACHE
     NOORDER;

CREATE SEQUENCE PROPERTY_ID_SEQ
     START WITH 1
     MAXVALUE 999999999999999999999999999
     MINVALUE 1
     NOCYCLE
     NOCACHE
     NOORDER;
At this point you could create a database trigger to automatically use the sequence when inserting data into the table, but we are going to get the database adapter to do it
Step 2: Create data source in WebLogic
We need to create a connection in WebLogic so that we can use it in our database adapter. This is a pretty common thing to do in WebLogic, so you should be aware of how to do it already. But in summary:
- Create a JDBC Data Source by going to the Services->Data Sources page and clicking ‘New’->’Generic Data Source’
- Fill out the details, make sure to set a JDBC name (eg: jdbc/demoDatabase)
- You will need to connect as the user we created above (DEMOUSER)
- Create an Outbound Connection Pool by going to Deployment->DBAdapter->Configuration->Outbound Connection Pools
- Create a new instance in the javax.resource.cci.ConnectionFactory group
- Set the JNDI name (eg: eis/DB/Demo)
- Click the newly created instance and go to the properties tab. Change the following:
- xADataSourceName to the jdbc name from above (jdbc/demoDatabase)
- sequencePreallocationSize to 1
- make sure usesNativeSequencing is true
- Update the deployment by selecting the DbAdapter and clicking ‘Update’
It’s really important to set sequencePreallocationSize to match the increment value in your Sequence (which is 1 by default). Normally the default in WebLogic is 50, so if you leave it the way it is the DbAdapter will create 50 instances okay and then go ask the Sequence for the next number. The Sequence will return the last value it gave to WebLogic + 1, which will be 2 in this case. This will cause constraint problems, so make sure these values match!
Step 3: Implement in SOA Suite
To demonstrate the capability let’s just make the simplest possible composite. First create an application with a BPM project (doesn’t matter what you call it). Then drag a database adapter onto the ‘External References’ column in the composite. The Database Adapter will start up.
- Give it a name (eg: PropertyManage)
- Create a database connection (logging in as the DEMOUSER from above). Set the JNDI name to the one you created (eis/DB/Demo)
- Choose ‘Insert Only’
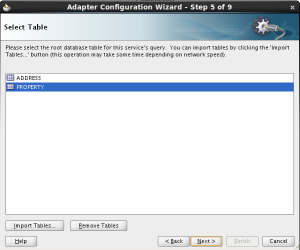
- Select the ‘PROPERTY’ and ‘ADDRESS’ tables. Make sure that ‘PROPERTY’ is selected when you click ‘Next’ as this will set it as the root table
- Click ‘Next’ to accept all the relationships. You need both of them (one for each direction) so that the DbAdapter understands the relationships
- Accept the default selections on the ‘Attribute Filtering’ screen
- On the ‘Advanced Options’ we need to tell the adapter about the sequences we need to use in the ‘Native Sequencing (Oracle only)’ section. This UI Control is a little confusing, each table you selected will be in the ‘Table’ dropdown and you need to select the corresponding sequence.
- For the Property table, press ‘Search’ and then select the ‘PROPERTY_ID_SEQ’ sequence
- Change the ‘Table’ to Address, press ‘Search’ and then select the ‘ADDRESS_ID_SEQ’ sequence. Don’t worry your Property selection is still recorded.
- Click ‘Finish’
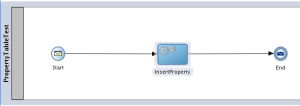
With the Database Adapter created we just need to call it. The quickest way to do that is to create a BPM (or BPEL) process.
- Drag a ‘Service Task’ on to the flow
- Call it ‘Insert Property’
- On the ‘Implementation’ screen select the database adapter service we created above in the ‘Service Call-Service’ section
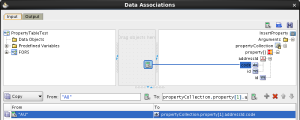
- Click the ‘Data Associations’ and lets just hard code an address code in. We leave everything else blank.
Our process should now look like this:
Deploy the composite and then test it using the test page in Enterprise Manager. You should see that you have 1 entry in your ADDRESS table (with ‘AU’ as the code) and one entry in the PROPERTY table that references the ADDRESS table in the ADDRESS_ID column. Running the test again should result in another entry in each table, but with incremented primary keys.
In a later post we’ll delve in the *-or-mappings.xml file and show how the choices you make in the DbAdapter GUI are reflected in the underlying configuration data.


Hi Dear
i do all of above steps but i think soa db composite can’t recognize my db sequence because it only insert 0 value for my PK. clearly it doesn’t use SEQ
LikeLike
Hi Fazel, are you sure you got all the configuration? In particular the ‘usesNativeSequencing’ in the adapter in WebLogic and assigning the correct sequence in the DBAdapter config in SOA?
LikeLike
Thanks Joel
I found the problem
i did all of configuration properly as you post, but my primary key that sequence apply on it uses NUMBER without length.I change it to NUMBER(12) then works fine.
LikeLike